How Many Pixels Is 1 mm in a Photo?
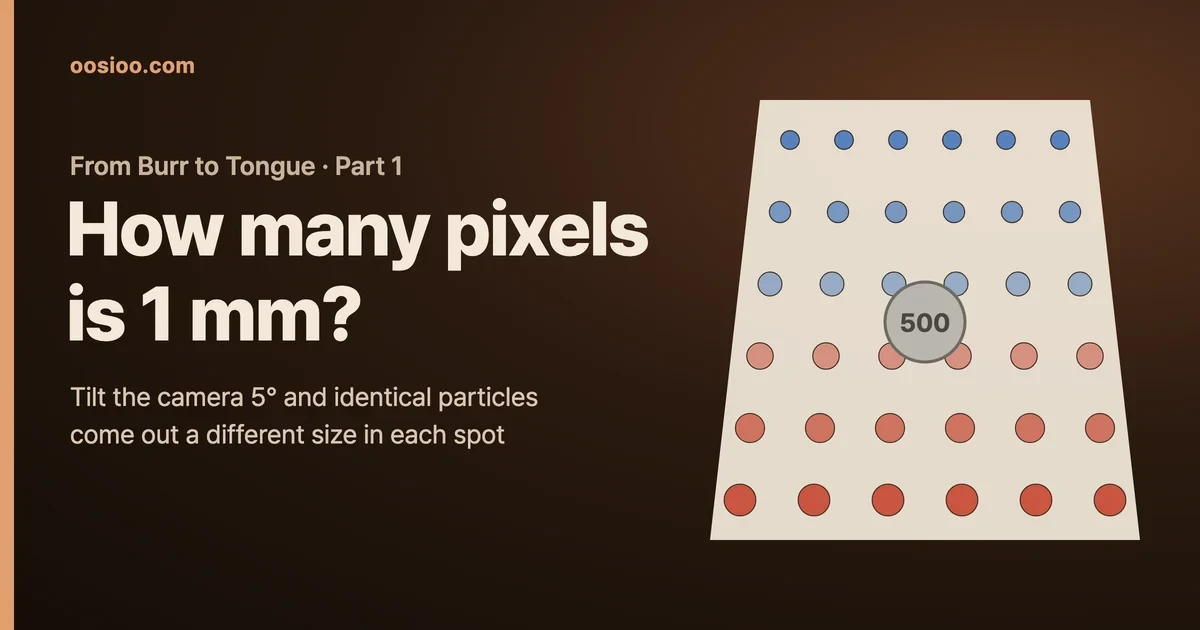
Set the magnification with a single coin, and you're assuming the whole photo shares that same magnification. Tilt the phone 5° and particles of the same size get captured nearly 9 percentage points differently depending on where they sit — yet the coin itself distorts by only 0.4%. A pinhole-camera look at the first step of measuring photos.
To measure the size of coffee grounds from a photo, there's one question you have to answer first. How many pixels is 1 mm in the photo?
No matter how sophisticated the particle-detection algorithm is, the result comes out in pixels. An answer like "this particle is 23 pixels in diameter" is useless on its own. You need a magnification factor that converts pixels to millimeters before the number becomes a statement about coffee. And if that magnification is wrong, everything built on top of it is wrong too — the particle-size distribution, the average size, the comparison between grinders.
Some people have already tackled this problem. The astrophysicist Jonathan Gagné built coffeegrindsize, an open program for analyzing photos of coffee grounds. The program sets the magnification by having a coin photographed alongside the grounds. In Korea, a column by the coffee community Unspecialty, "Developing a Grind-Size Guide" (2023), went a step further. They drew a 100 mm square on paper, attached 10 mm ArUco markers to its four corners, warped the photo into a head-on view, and calibrated one pixel to 0.0275 mm (27.5 µm). The column explains that a single coin can't correct for the photo's distortion — you need at least four points.
Why isn't one coin enough? How far off does it go? This piece works through that question from the camera's side.
A Camera That Starts with a Single Pinhole
The way a camera transforms size is easiest to see in the simplest possible camera. Poke a single pinhole in the wall of a dark room, and an inverted image of the outside scene forms on the opposite wall. This principle has been known for a very long time.
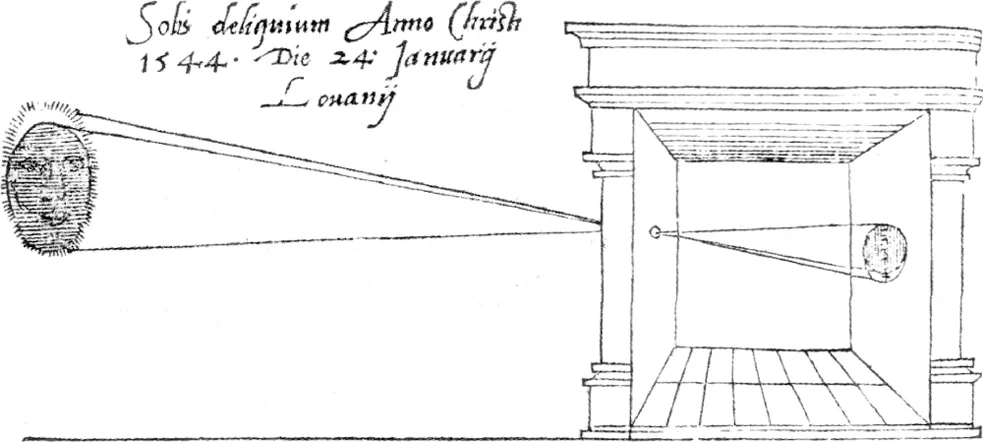
A camera obscura observing a solar eclipse at Louvain in January 1544. This is considered the earliest known camera obscura illustration in print. Image: Gemma Frisius, De Radio Astronomica et Geometrica (1545) / Wikimedia Commons (public domain)
Light passing through a pinhole travels in a straight line. So light from the top of an object passes through the hole and lands at the bottom, while light from the bottom lands at the top. If D is the distance from the object to the hole, and f is the distance from the hole to the wall (the sensor), the two triangles are similar. An object of size L forms an image of size L × f ÷ D.
A phone camera has several lenses instead of a pinhole, but when calculating the size of an object in a photo, this pinhole model explains most of what matters. It's also the starting point for how computer vision treats cameras (Hartley & Zisserman 2004). Where lenses depart from this model is covered later.
The first people to use this geometry were painters. In his 1525 treatise on perspective, Albrecht Dürer included a device for tracing a lute onto paper.
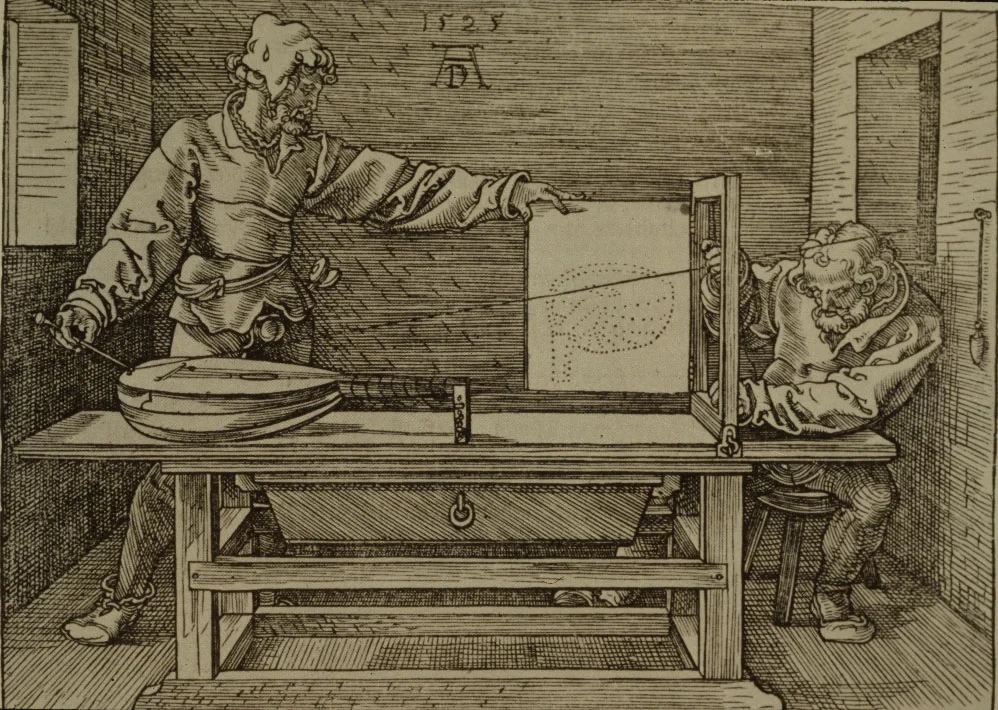
Dürer's lute-drawing device (1525). The ring on the wall plays the role of the eye (the pinhole), the thread is the ray of light, and the wooden frame is the sensor. Marking the point where the thread crosses the frame, one dot at a time, produces a drawing in correct perspective. Image: Albrecht Dürer, Underweysung der Messung / Wikimedia Commons (public domain)
In this device, the near end of the lute is traced large and the far end small. Objects of the same size form images of different sizes depending on their distance. Every problem in this piece stems from that fact.
Shoot from 15 cm Up, and 1 mm Becomes 20 Pixels
The pinhole formula becomes even simpler in pixels. If you express the focal length f in pixel units, then at a distance D (in mm), 1 mm equals f ÷ D pixels.
Take a typical modern phone's main camera as an example. If the photo is 4032×3024 pixels and the lens is equivalent to 26 mm on 35 mm film, the focal length in pixels comes out to roughly 3,030 pixels. Hold this camera 15 cm above a sheet of paper and 1 mm is about 20 pixels. One pixel covers roughly 50 µm of paper. Lower it to 10 cm and that becomes 30 pixels; raise it to 30 cm and it drops to 10 pixels.
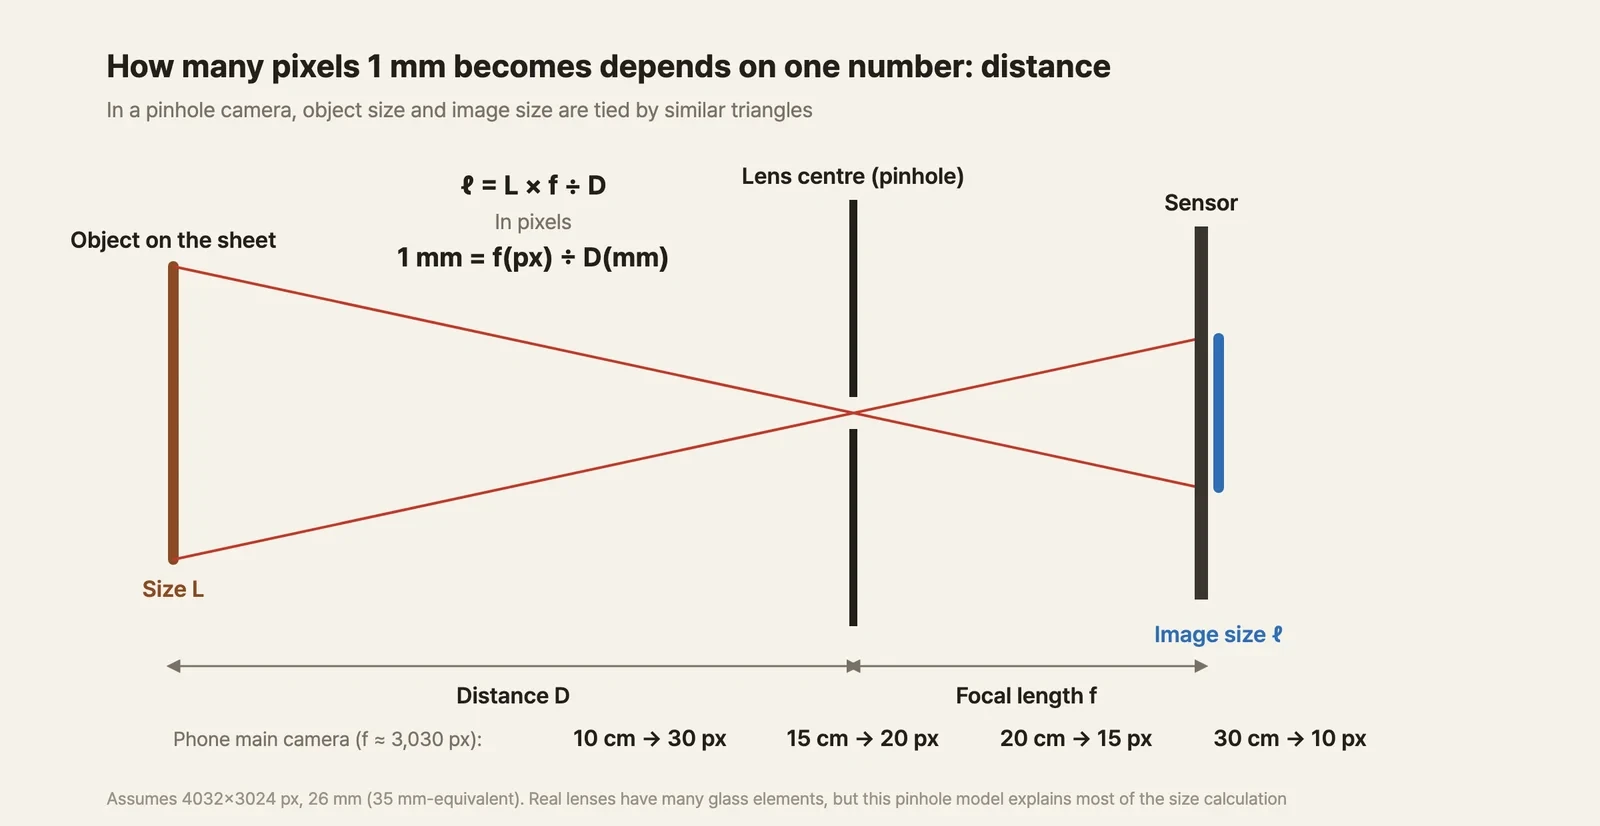
One number is worth pausing on. The fines peak in ground coffee's size distribution sits around 30–40 µm (Mo 2023). In a photo taken from 15 cm up, that's smaller than a single pixel. What you can and can't count when measuring coffee from a photo is already decided by this magnification.
Setting the magnification ultimately requires knowing the distance D. But when you hold a phone in your hand and shoot, there's no way to know D precisely. So you photograph an object of known size alongside the grounds.
Setting the Magnification with a Single Coin
Gagné's program has you click one edge of the coin in the photo and then the opposite edge with the mouse. It measures the number of pixels between them, divides by the coin's actual diameter, and out comes the magnification (px/mm). The program has a built-in list of diameters for Canadian, US, and euro coins. For a 500-won coin, you'd enter a diameter of 26.5 mm.
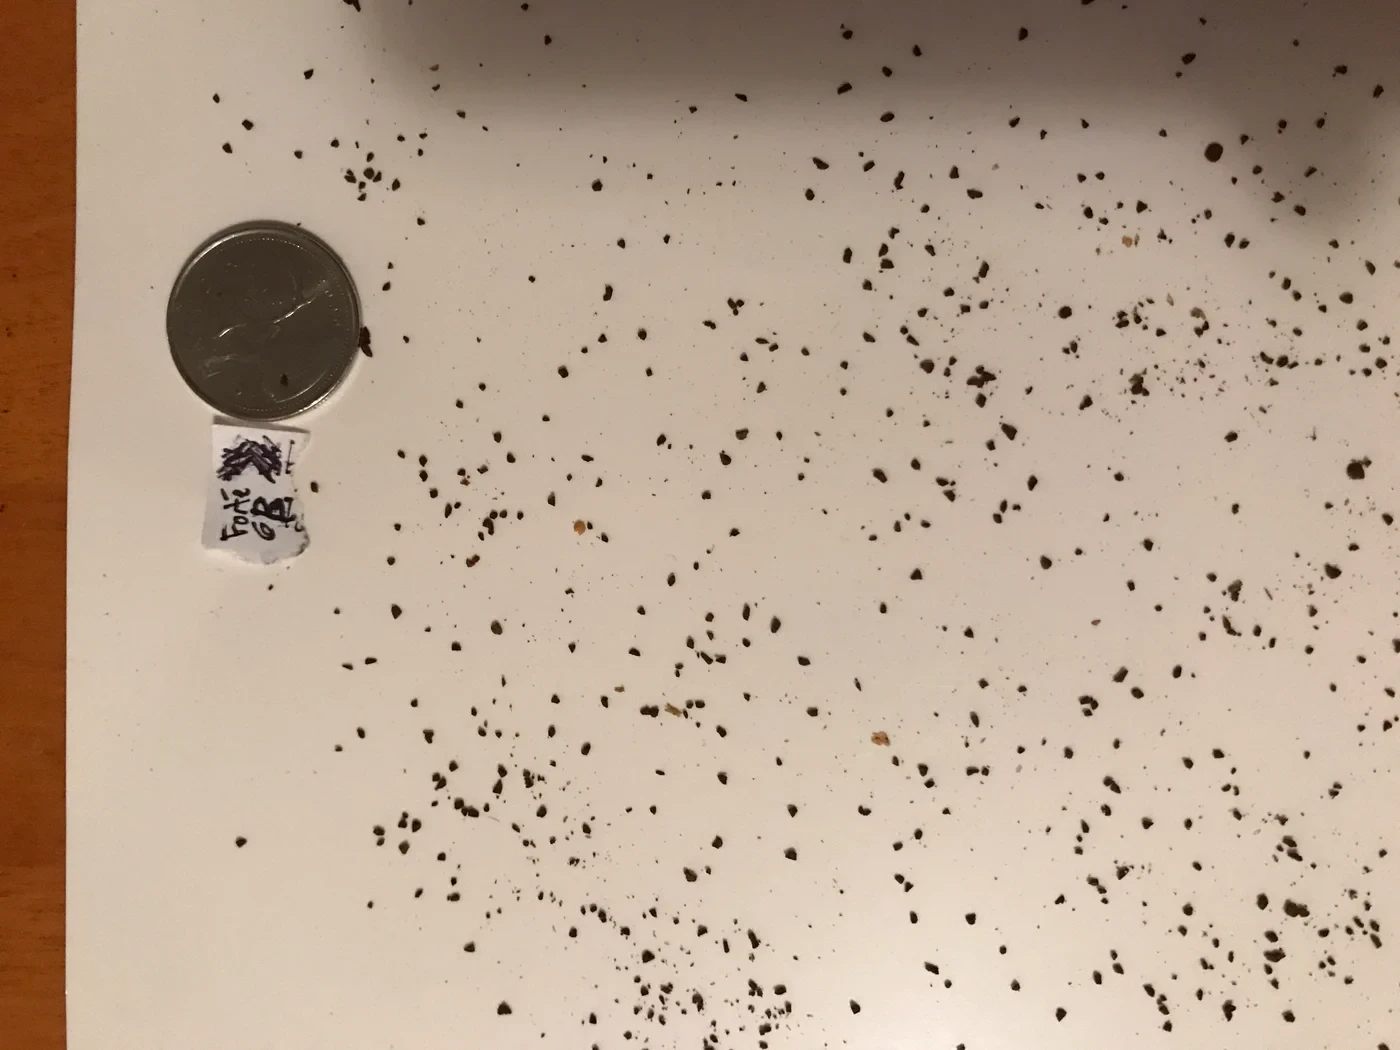
A sample shot from the coffeegrindsize manual. The grounds are spread so they don't touch each other, and a coin of known size is photographed alongside them. Photo: Jonathan Gagné, coffeegrindsize (MIT license)
The manual also spells out shooting technique in detail. Shoot straight down at the paper, perpendicular to it. There should be no shadows, and the focus must be sharp. When measuring the coin, it warns of two things. First, if the camera is at an angle, the coin will appear elliptical — and in that case, you must measure along the short axis, since otherwise the result will be badly skewed. Second, don't let the coin's thickness get mixed into the length measurement.
This method rests on one assumption: that the magnification is the same across the entire photo. If 1 mm equals 20 pixels where the coin sits, then 1 mm must also equal 20 pixels in the far corner of the photo. That assumption only holds when the camera sensor is exactly parallel to the paper.
When the Camera Tilts
Suppose the phone isn't parallel to the paper but tilted slightly. Then one side of the paper is closer to the camera and the other side farther away. Just as with Dürer's lute, the nearer particles are captured larger and the farther ones smaller.
How big is the difference? The simulation below places the phone camera assumed earlier above a sheet of paper. Disks of identical size — 4 mm in diameter — are arranged inside a 100 mm square, and all of them are measured using a single magnification factor set by the coin. The color shows how much larger (red) or smaller (blue) each disk was measured relative to its true size. Try changing the height and tilt, and also the coin's position and the axis used to measure it.
At a height of 15 cm, if the camera tilts 5°, placing the coin at the center means disk sizes vary from −4.2% to +4.5% depending on position (model estimate). The gap between the largest-measured and smallest-measured disk is nearly 9 percentage points. At 10° tilt, that range nearly doubles to 17 percentage points. Things get worse if the coin sits in a corner of the photo. In a photo tilted 10°, with the coin in the far corner, the disk at the opposite corner is measured 19% larger than its true size.
This error has a nasty character. An error that enlarges or shrinks every particle by the same ratio would be preferable — the average would be wrong, but comparisons between grinders would still hold up fine. The error from tilt is different at every position. Particles of identical size get captured at different sizes depending on where they sit, so the measured distribution spreads wider than the real one. You take the photo to see how even the grind is, and the camera itself blurs that very evenness.
The Coin Doesn't Tell You the Tilt
So couldn't you just check whether the coin looks elliptical and catch the tilt that way? The manual itself says to measure the short axis if the coin looks elliptical. Running the numbers, this approach barely works at all.
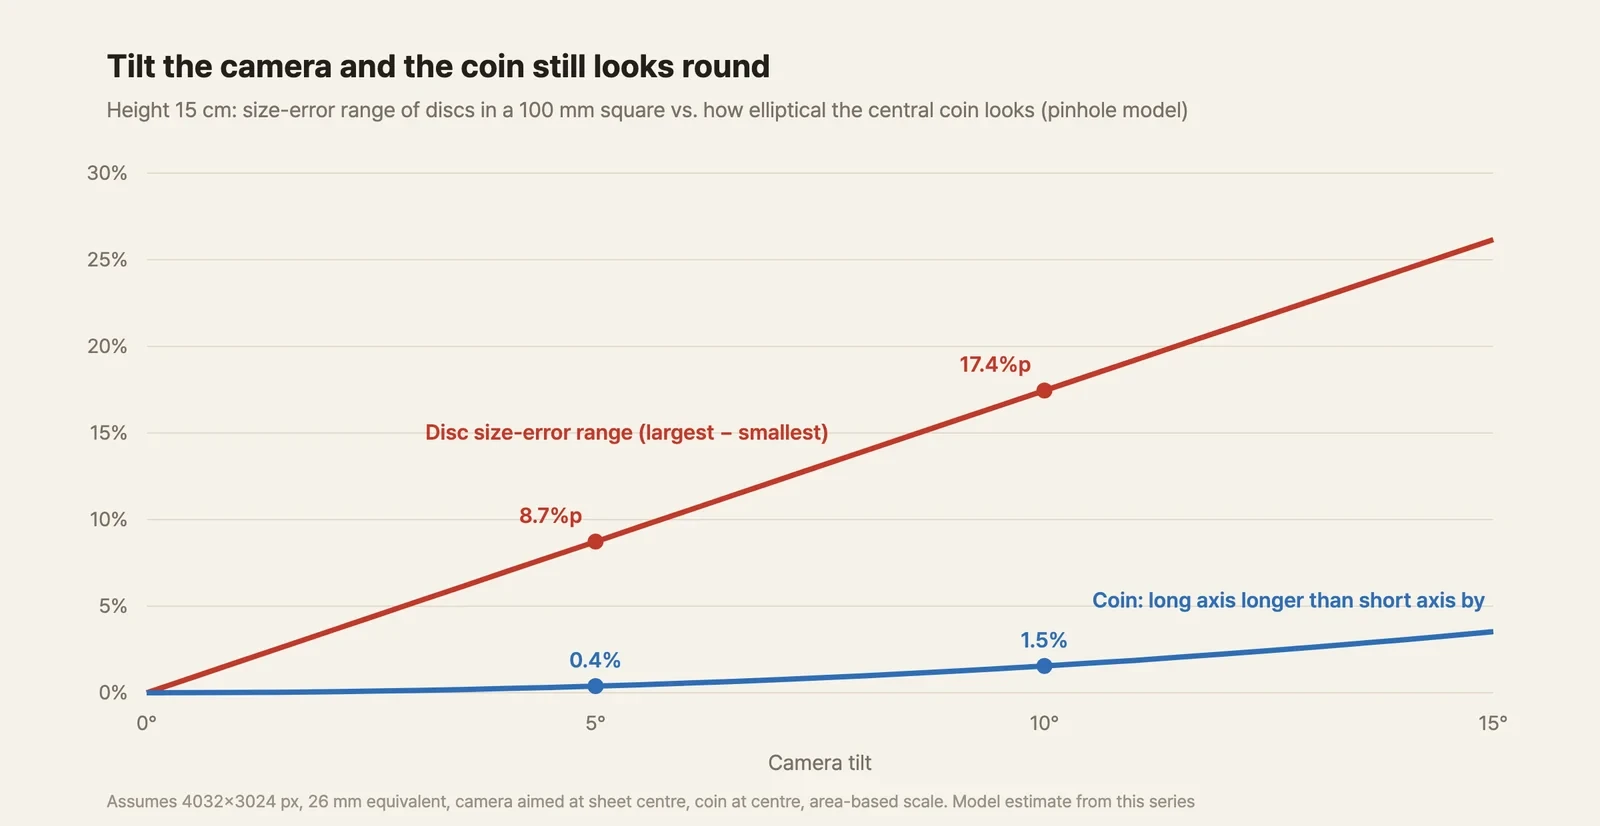
Height 15 cm, coin at center. As tilt increases, the size error on the paper (red) grows immediately, but the coin's distortion (blue) only becomes noticeable much later. Calculated using this series' pinhole model
At 5° of tilt, the center coin's long axis is 0.4% longer than its short axis. For a 26.5 mm coin photographed at 20 px/mm — about 530 pixels across — that's a 2-pixel difference. That's not a difference you can see with the precision of clicking the coin's edge by hand. And this is true even though the disks in that same photo are already off from each other by nearly 9 percentage points.
The reason is that the two effects grow at different rates. A tilted circle shortens by a factor of cos θ in the direction of the tilt. At 5°, cos 5° = 0.996 — essentially 1. But the difference in distance between the two ends of the paper is directly proportional to the tilt. At 5° tilt, the two ends of a 100 mm sheet differ in distance from the camera by about 9 mm — 6% relative to 15 cm. The first effect grows roughly with the square of the tilt angle; the second grows in direct proportion to it. At small tilts, the second effect dominates completely.
What about an actual photo? I cropped the coin from the photo Gagné's manual labels as the "better example" and fit an ellipse to its edge.
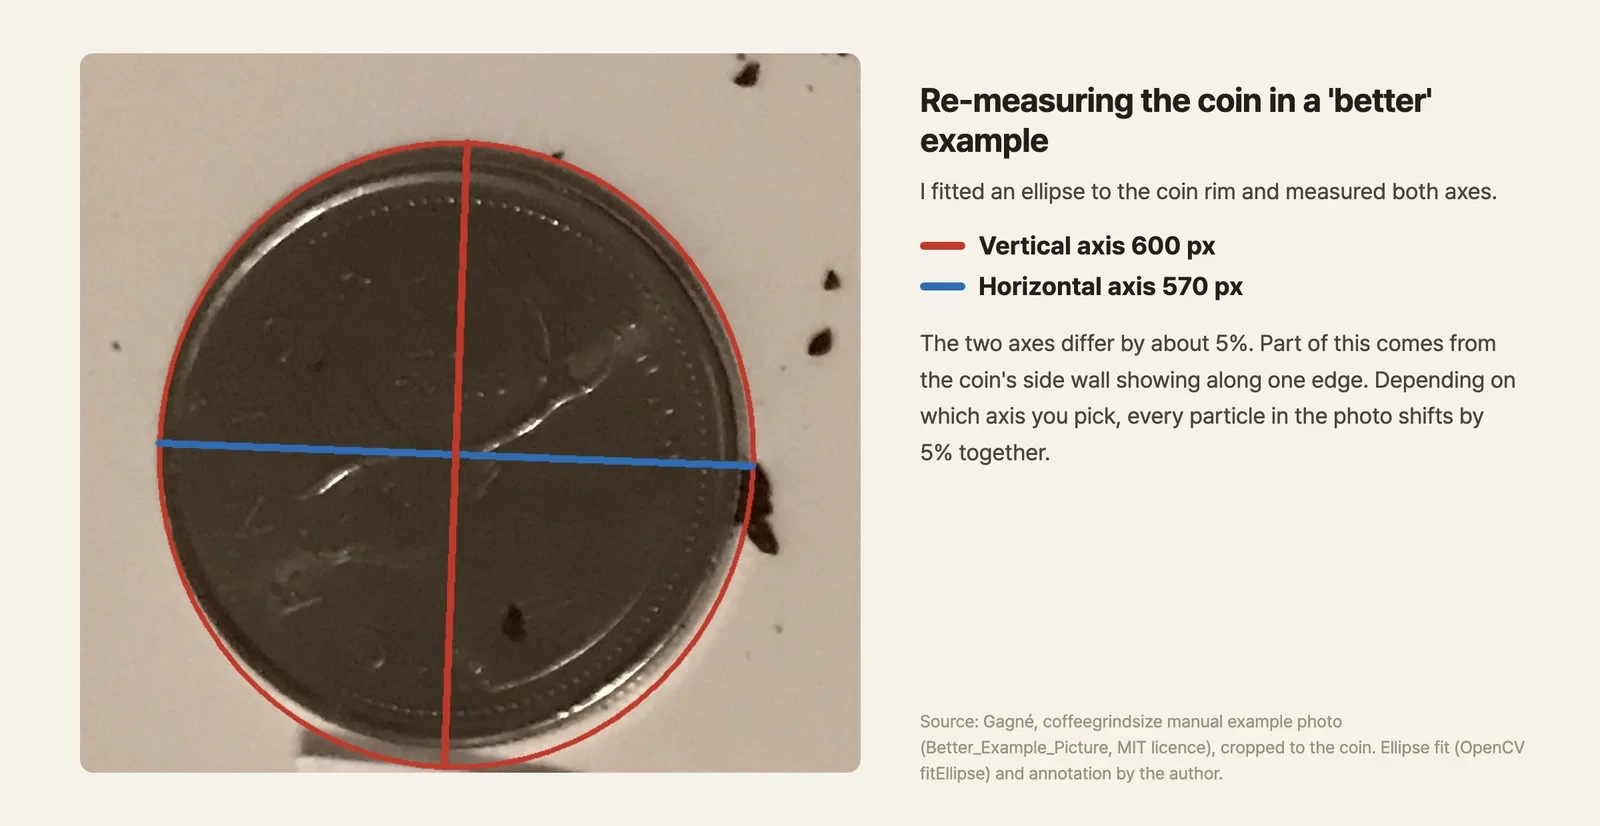
The coin from the manual's example photo. The vertical axis is about 600 pixels and the horizontal axis about 570 pixels — a 5% difference. Source: Jonathan Gagné, coffeegrindsize (MIT license). Ellipse fitting (OpenCV) and annotation are my own
The two axes differ by about 5%. Tilt alone doesn't account for this difference. The coin's side wall shows along one part of the rim, and because the coin sits near the edge of the photo, the camera also sees that side wall at an angle. Either way, the result is the same: depending on which axis you choose, every particle's measured size in that photo shifts by 5% together.
The advice to pick the short axis has its own limits. In a tilted photo, the short axis is the length shortened in the direction of the tilt. But particles lie in every direction at random. A particle's area changes by the product of the magnification in two directions, so no single axis's magnification can correct for it. To correct by area, you'd need the geometric mean of the two axes — and even then, the position-dependent error remains. A single magnification number can't describe a tilted plane.
The Coin's Thickness
The coin also has thickness. A 500-won coin is 2.0 mm thick. What we click on in the photo is the edge of the coin's top face, while the coffee grounds lie flat on the paper itself.
The top face is 2 mm closer to the camera. Shot from 15 cm up, the coin's top face is captured 1.35% larger than the surface it sits on (model estimate). That makes the magnification you set too large by that amount, so every particle is measured 1.35% too small. Move in to 10 cm and it's 2.0%; back off to 30 cm and it's 0.7%. The closer you shoot, the bigger the error.
Unlike tilt, this error applies equally to every particle. It leaves the shape of the distribution untouched and just shifts it bodily. It becomes a problem when comparing results measured by different people, with different coins, at different heights.
A Lens Isn't a Pinhole
Everything so far has assumed the camera is a perfect pinhole. Real lenses bend straight lines slightly. Moving away from the center of the photo, the image either pulls inward (barrel distortion) or stretches outward (pincushion distortion). This bending grows with distance from the center of the photo, so it's called radial distortion.
Photogrammetry has long handled this distortion with polynomials — a model in which the image point shifts by terms like r³, r⁵ relative to its distance r from the center (Brown 1966). The method used today to calibrate cameras in computer vision uses this same model: photograph a checkerboard from several angles and solve for the coefficients (Zhang 2000).
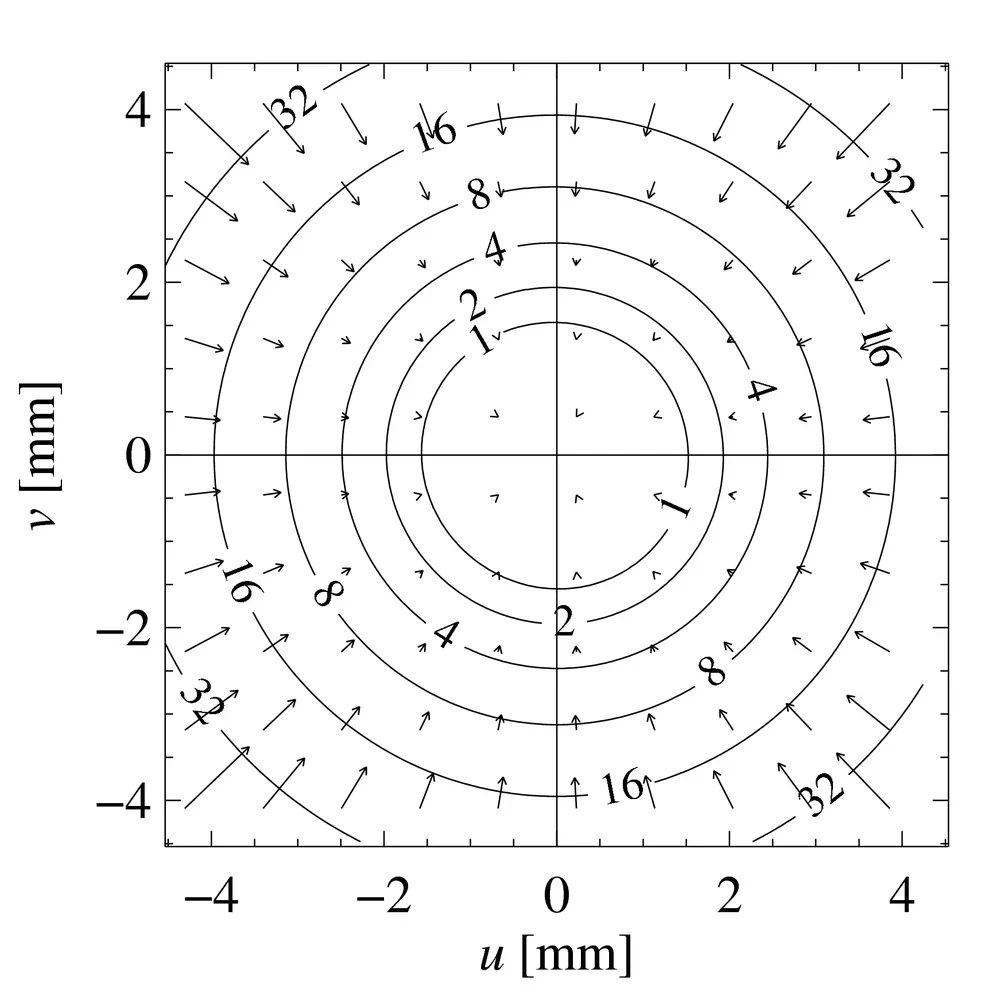
A photogrammetric map of the distortion of a 20 mm Nikkor lens (focused at 1 m). The contour numbers are the correction amount in length, and the arrows show the correction direction (lengths exaggerated 15×). Image: Georg Wiora / Wikimedia Commons (CC BY-SA 3.0)
In this map, the contour numbers double each time: 1, 2, 4, 8, 16, 32. But the spacing between contours keeps narrowing. Every roughly 1.26-fold increase in radius doubles the correction amount. Since 1.26 cubed is 2, the correction amount is proportional to the cube of the radius — the first term of the Brown model showing through directly. Near the center, things are nearly fine; toward the edges, they deteriorate sharply.
Phones erase much of this distortion in software. Apple states that the iPhone's "Lens Correction" setting adjusts front-camera and ultra-wide-camera photos to look more natural, and that it's on by default (Apple). However, there's no published figure for how much distortion remains after correction. If you want to use the far edges of a single photo for measurement, you have to check this yourself.
One more thing to watch for. Macro photography, introduced starting with the iPhone 13 Pro, uses the ultra-wide camera to shoot from as close as 2 cm away (Apple 2021). If you turn on macro mode to photograph small particles larger, you end up shooting from the closest distance with the lens that has the most distortion. The closer you shoot, the bigger the thickness and tilt errors discussed above also become. Capturing something larger in the frame doesn't mean measuring it more accurately.
Putting the Errors Side by Side
Here's a summary of the errors covered so far, benchmarked to a phone's main camera at a height of 15 cm. All figures are calculated using this series' pinhole model, assuming a lens-corrected camera.
| Source of error | Magnitude | Character |
|---|---|---|
| 2° camera tilt | roughly ±2% depending on position | widens the distribution |
| 5° camera tilt | −4.2% to +4.5% | widens the distribution |
| 10° camera tilt | −8.1% to +9.4% | widens the distribution |
| Coin placed in corner of tilted photo (10°) | 0 to +19% | widens the distribution and skews it in one direction |
| Which axis of the coin is measured | about 5% in the manual's example photo | shifts everything |
| Measuring by the coin's top face (2 mm thick) | −1.35% | shifts everything |
| Lens radial distortion | small at center, growing with the cube of the radius toward the edges | widens the distribution |
The right-hand column matters. An error that "shifts everything" throws off the average, but photos shot the same way can still be compared against each other. An error that "widens the distribution" makes a grinder's consistency look worse than it really is. Since the usual reason for measuring grind size from a photo is to check uniformity, the latter kind of error is the more troublesome one.
Why More Points Are Needed
What a single coin gives you is, in effect, just one number — the magnification. But describing the relationship between a tilted plane and its image in a photo takes far more numbers than that. You need to know which direction it's tilted and by how much, and which parts are near and which are far. The perspective transform that maps points on a plane to points in a photo has eight unknowns, and each point of known position gives you two equations. So you need at least four points. That's why the Unspecialty column attached markers to all four corners.
With four markers, once you unwarp the perspective, tilt error disappears in principle. Since the markers are printed on the paper, thickness isn't an issue either. But new questions arise. How precisely can you locate each marker's corner? Is the paper really flat? Did the printer secretly shrink the size when printing? And lens distortion isn't removed by a planar transform.
Summary
Here's what can be said right now about magnification when measuring coffee from a photo.
- How many pixels 1 mm is gets fixed by the distance between the camera and the paper. Shot from 15 cm up with a phone's main camera, that's about 20 pixels, with one pixel covering roughly 50 µm. The fines peak (30–40 µm) is smaller than a single pixel
- A magnification set by a single coin relies on the assumption that the whole photo shares the same magnification. That assumption only holds when the camera is parallel to the paper
- Tilt the camera 5°, and identical particles get captured at sizes differing by nearly 9 percentage points depending on position. This error widens the distribution, making the grind look less even than it really is
- At that same tilt, the coin itself distorts by only 0.4%. It's hard to detect the tilt just by looking at the coin
- The coin's thickness and which axis you choose both shift every particle together by a few percent
- Lens distortion grows sharply toward the edges. Phones correct for it in software, but how much remains uncorrected isn't disclosed. Macro mode means shooting close with the lens that has the most distortion
If you have to shoot with a coin right now, there's still something you can do. Hold the phone as parallel to the paper as possible, keep the coin and grounds gathered near the center of the frame, and don't get too close. But to eliminate the error that remains even then, one point isn't enough.
References
- Gagné J. coffeegrindsize. GitHub repository and user manual (Coffee Grind Size User Manual). Link — MIT license; code (coin-diameter list, magnification calculation) and manual text verified
- Unspecialty (2023). "Developing a Grind-Size Guide." Link — original text verified
- Hartley R, Zisserman A (2004). Multiple View Geometry in Computer Vision, 2nd ed. Cambridge University Press. doi:10.1017/CBO9780511811685 — standard textbook for the pinhole camera model and planar perspective transforms
- Brown DC (1966). Decentering distortion of lenses. Photogrammetric Engineering 32(3), 444–462 — bibliographic reference verified
- Zhang Z (2000). A flexible new technique for camera calibration. IEEE Transactions on Pattern Analysis and Machine Intelligence 22(11), 1330–1334. doi:10.1109/34.888718 — bibliographic reference verified
- Mo C et al. (2023). Exploring the link between coffee matrix microstructure and flow properties using combined X-ray microtomography and smoothed particle hydrodynamics simulations. Scientific Reports 13, 16374. doi:10.1038/s41598-023-42380-y — original text verified
- Apple. Change advanced camera settings on iPhone (Lens Correction). Link — official documentation verified
- Apple (2021). Apple unveils iPhone 13 Pro and iPhone 13 Pro Max. Link — macro minimum focus distance of 2 cm verified
- Bank of Korea. History of coin design changes (500-won coin diameter 26.50 mm). Link; thickness of 2.00 mm from Wikipedia, "500 Won Coin"
Image Credits
- Camera obscura: Gemma Frisius (1545), Wikimedia Commons, public domain
- Lute-drawing device: Albrecht Dürer (1525), Wikimedia Commons, public domain
- coffeegrindsize sample shot and coin close-up: Jonathan Gagné, coffeegrindsize, MIT license (coin close-up cropped and annotated with an ellipse)
- Lens distortion map: Georg Wiora, Wikimedia Commons, CC BY-SA 3.0 (transparent background changed to white)
- All other illustrations and the simulation: created by the author


